Install with Raspberry Pi Imager
Raspberry Pi Imager can install our images the same way it installs Raspberry Pi OS: point it at the YUMI-LAB image list once, and every Smart Pi One image appears in its menu — downloaded, verified and written to the card in one step. No manual download, no checksum to compare, no .img.xz to unpack.
The image list lives at:
It is regenerated with every release, so the menu always offers the newest images.
Imager 2.0 or newer
Earlier versions cannot be pointed at a custom image list from the interface. Check yours with Raspberry Pi Imager → About.
1. What you need
A microSD card. This is the board's only disk, and it is where most "it will not boot" stories start: a slow or counterfeit card corrupts itself after a few power cycles. Buy a genuine, high-speed card — Class 10 / V30 or better — from a source you trust.
YUMI 16 GB microSD — Class 10 V30
Capacity: 4 GB minimum, 8 GB or more for a desktop image, 32 GB maximum — larger cards are not supported.
A way to plug the card into your computer, depending on what your machine has:
| Your computer | What you need |
|---|---|
| A full-size SD slot (most laptops) | A microSD-to-SD adapter — usually supplied with the card |
| No card slot at all | A microSD-to-USB reader, a few euros in any computer shop |
Raspberry Pi Imager 2.0 or newer, from raspberrypi.com/software — Windows, macOS and Linux.
2. Point Imager at the YUMI-LAB list
Works the same on Windows, macOS and Linux, and the setting is remembered.
1. Open Raspberry Pi Imager and click APP OPTIONS, at the bottom left.
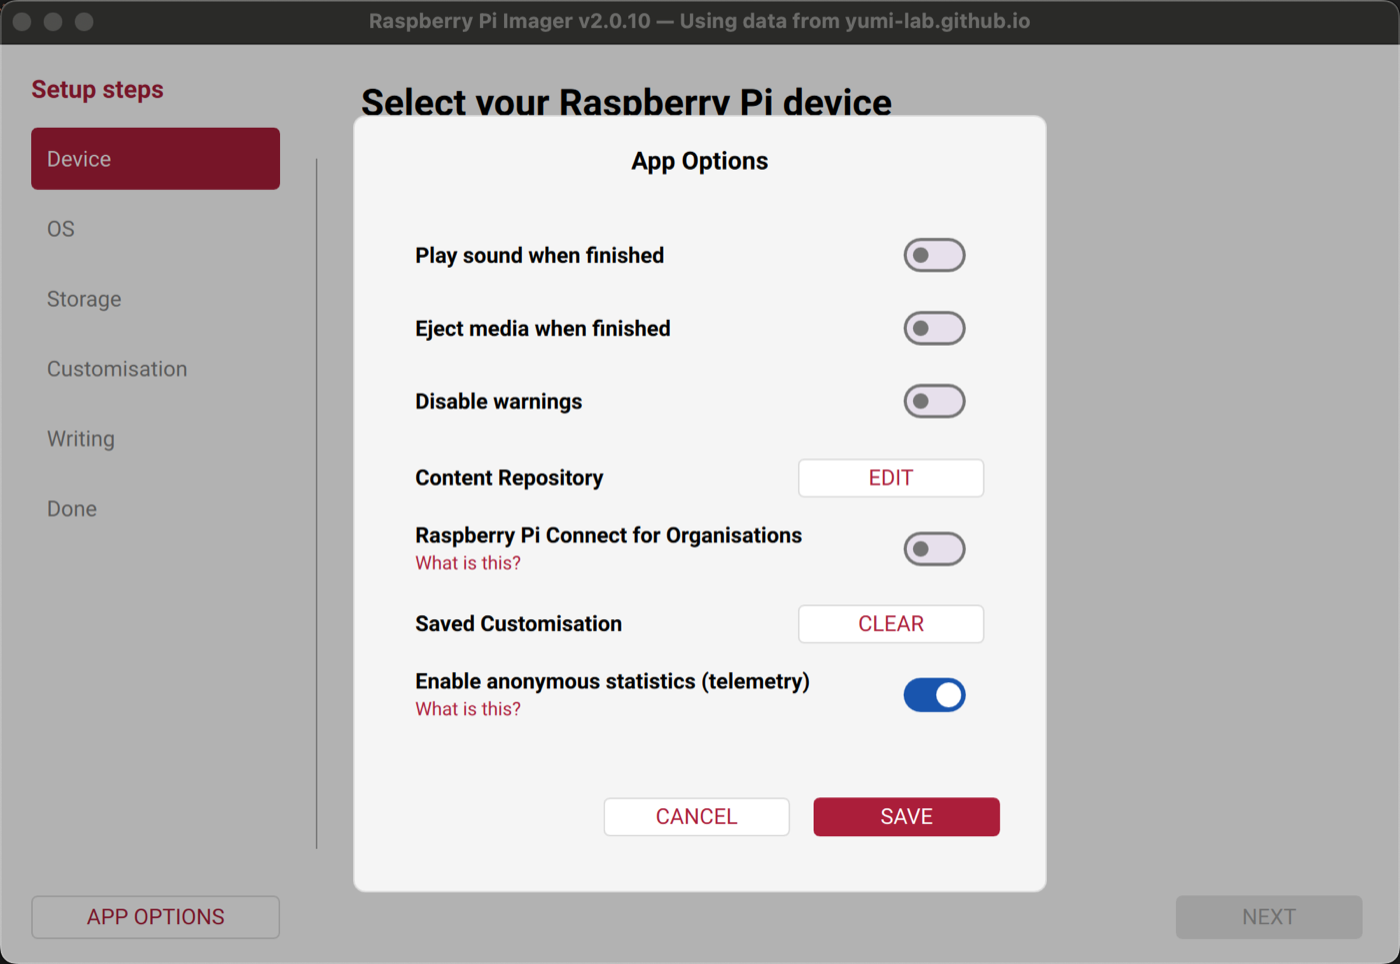
2. On the Content Repository line, click EDIT.
3. Select Use custom URL and paste the address:
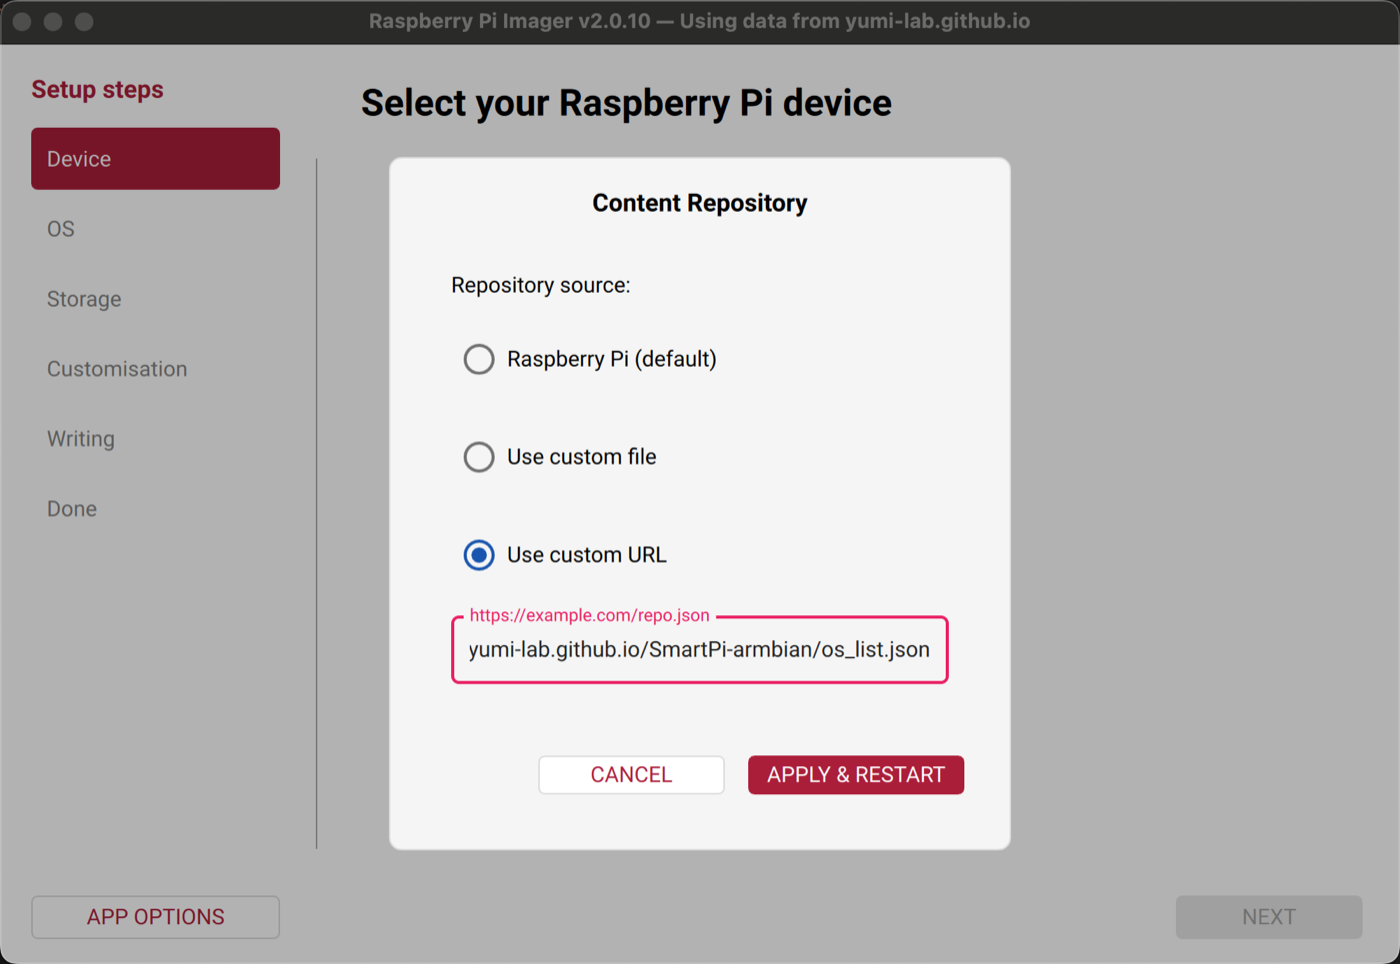
4. Click APPLY & RESTART. Imager restarts and its title bar becomes "Using data from yumi-lab.github.io" — that is how you know the list is loaded.
Useful for a one-off run: it does not change the saved setting, it only applies to that launch.
Windows (Command Prompt or PowerShell):
"C:\Program Files (x86)\Raspberry Pi Imager\rpi-imager.exe" --repo https://yumi-lab.github.io/SmartPi-armbian/os_list.json
macOS (Terminal):
"/Applications/Raspberry Pi Imager.app/Contents/MacOS/rpi-imager" --repo https://yumi-lab.github.io/SmartPi-armbian/os_list.json
Linux:
3. On the device step, choose "No filtering"
Imager opens on "Select your Raspberry Pi device". Scroll to the bottom of the list and select No filtering — Show every possible image, then click NEXT.
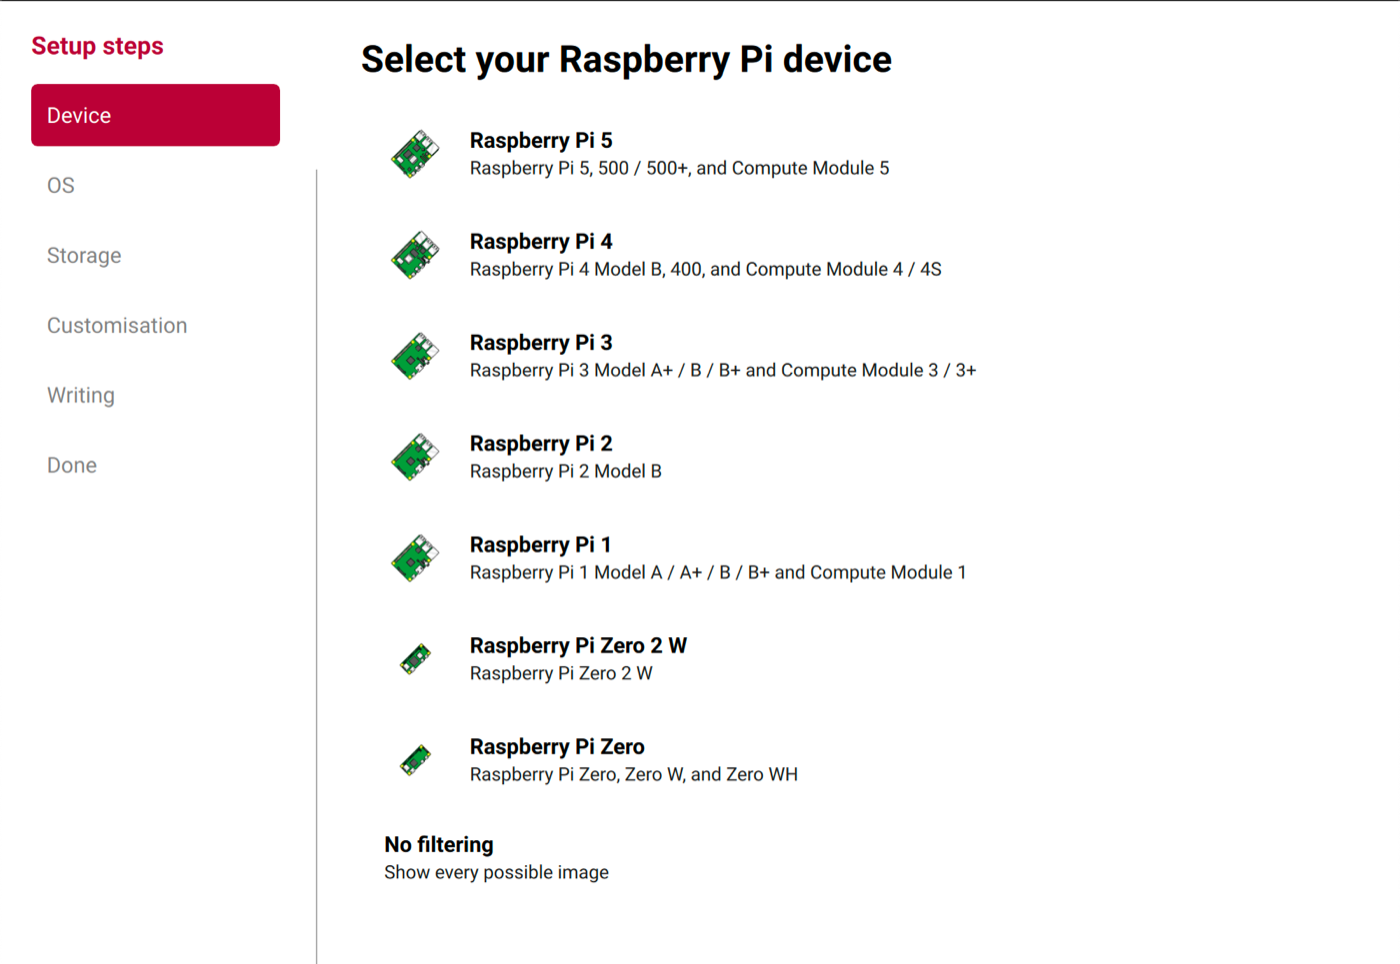
Not Raspberry Pi 5
Any other entry in that list works too — the Smart Pi One images show up all the same. Raspberry Pi 5 is the exception: pick it and the image list comes up without our images, because a Pi 5 only takes 64-bit images and the Smart Pi One is 32-bit ARM. No filtering keeps you out of that trap.
If your copy of Imager shows an empty list on this page, there is nothing to choose — click NEXT and carry on.
4. Choose your image
The "Choose operating system" page lists every YUMI-LAB image, each with its size and release date.
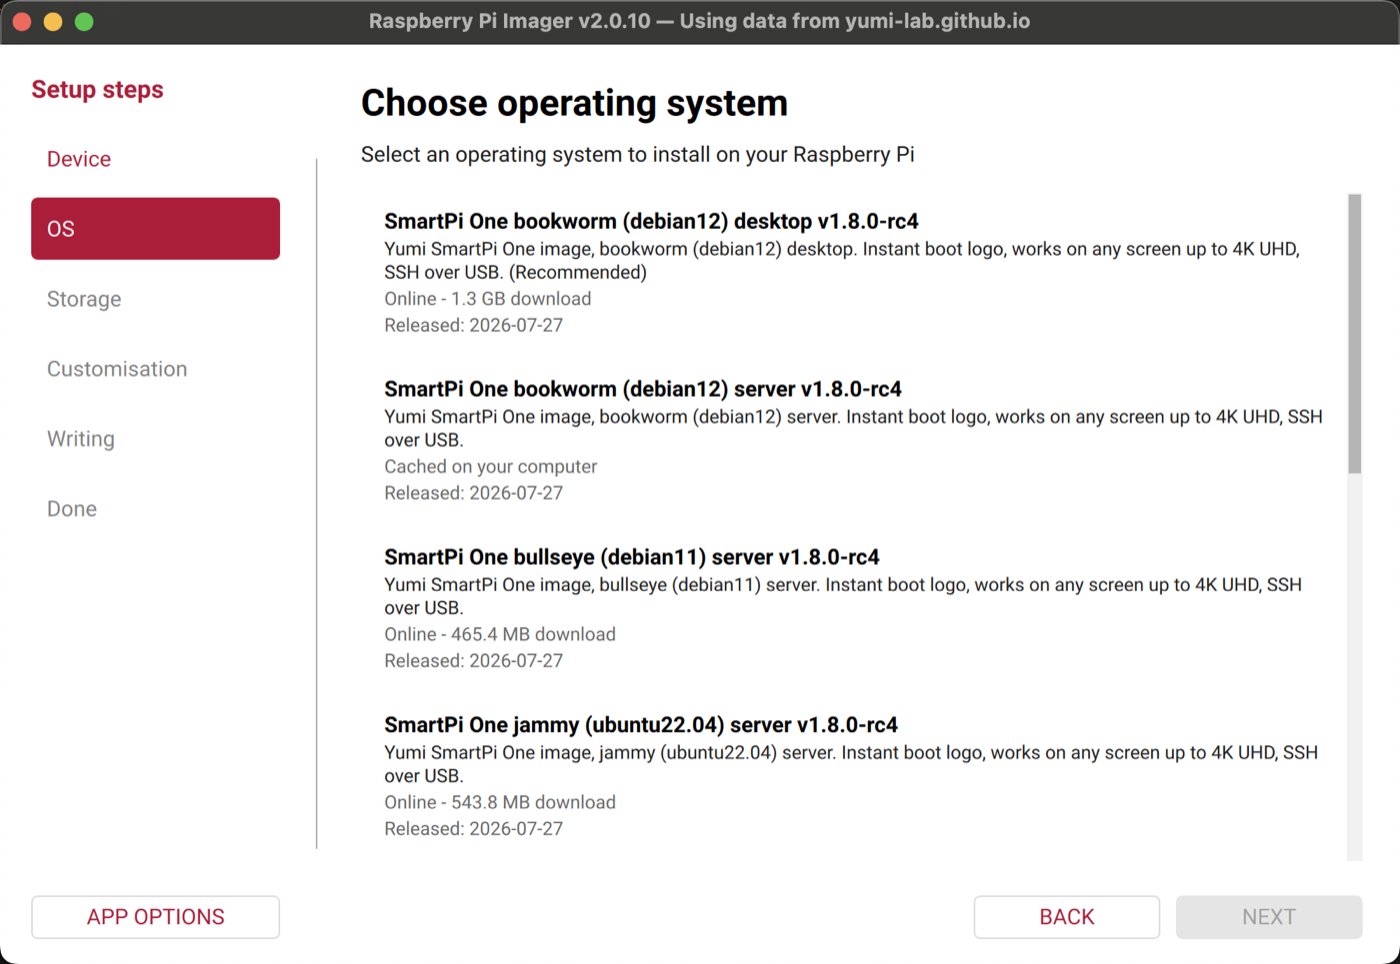
Entries are named SmartPi One <codename> (<distribution>) <edition> <version>:
| Part of the name | Meaning |
|---|---|
trixie, bookworm, bullseye, forky |
Debian 13, 12, 11, 14 (preview) |
noble, jammy |
Ubuntu 24.04, 22.04 |
server |
Headless — no desktop, ~465 MB to ~550 MB to download |
desktop (XFCE), desktop (i3), desktop (MATE) |
Graphical desktop, ~1.2 GB to 1.4 GB to download — the desktop environment is named directly in the entry |
Not sure which one? See Which one should I choose? — Debian 13 Trixie server is the usual answer.
Smart Pad owners
Pick the same images. The Smart Pad is a Smart Pi One with the 4.3" touchscreen fitted; the screen is detected at boot and the display rotated automatically.
5. Choose the card and write
1. On "Choose storage", select your microSD card. Check the size shown against the card in your reader — everything on the selected device is erased.
2. Imager offers the OS customisation settings used by Raspberry Pi OS (hostname, user, Wi-Fi, SSH key). They do not apply to our images: choose No, clear settings. Configure the board after the first boot instead — see Getting started.
3. Confirm, and let it run. Imager downloads the .img.xz, verifies the SHA-256 published with the release, writes it to the card and verifies what it wrote. Expect a few minutes for a server image, longer for a desktop one on a slow connection.
4. When it reports it is done, eject the card, put it in the Smart Pi One and power the board.
microSD card compatibility
- Minimum: 4 GB — a desktop image needs 8 GB or more
- Maximum: 32 GB — larger cards are not supported
- Speed and quality matter: see what you need
6. After the first boot
The board takes an address by DHCP on Ethernet, and also answers over the USB cable at 172.22.1.1 (see SSH over USB).
Log in as root with the password 1234; the system asks you to change it immediately and to create your own user. Two commands then confirm you are running the YUMI build:
cat /proc/device-tree/model
# YUMi SmartPi One

cat /sys/devices/system/cpu/cpu0/cpufreq/cpuinfo_max_freq
# 1296000  (1368000 once the optional overclock is enabled — see below)
The DietPi image is the exception — it uses its own accounts and configures itself with no questions at all.
The CPU overclock is optional — enable it with sudo smartpi-oc on once you are logged in.
7. Going back to the Raspberry Pi list
The custom URL stays until you change it. To install Raspberry Pi OS again: APP OPTIONS → Content Repository → EDIT → Raspberry Pi (default) → APPLY & RESTART. If you used the command line instead, just launch Imager normally.
8. If something goes wrong
| Symptom | Cause and fix |
|---|---|
| The list still shows Raspberry Pi OS | The repository was not applied. Check the title bar: it must read Using data from yumi-lab.github.io. |
| Content Repository is missing from App Options | Imager is older than 2.0 — update it from raspberrypi.com/software, or use the command line. |
| The device page is empty | Expected — click NEXT. Our list contains images, not board models. |
| The download stalls or fails | The images are served by GitHub. Retry, or download the .img.xz by hand and use Use custom in Imager. |
| The card is not offered | Reinsert it, try another reader, and remember cards larger than 32 GB are not supported. |
9. Prefer to do it manually?
Download the image yourself and write it with balenaEtcher or dd: