DietPi for Smart Pi One
DietPi is a minimal Debian distribution for single-board computers: a trimmed-down system, a curated software catalog, and a set of menu-driven configuration tools. YUMI-LAB publishes a DietPi variant for the Smart Pi One and the Smart Pad, built from our own Debian server image — Trixie (13) by default, with a Forky (14) preview build also available.
The result is about 293 MB compressed and idles at roughly 87 MB of RAM — against about 105 MB for the Armbian server image, and a third of its download size.
Unofficial DietPi build
This image is not an official DietPi release. It is maintained by YUMI-LAB and is currently a release candidate: it works, and we are still refining it. Report anything odd on the DietPi-SmartPi issue tracker.
For everything about DietPi itself — the software catalog, backups, services, the configuration tools — see the official DietPi documentation.
Repository: github.com/Yumi-Lab/DietPi-SmartPi
1. What it is, and why
The image starts from our SmartPi-armbian Debian server build (Trixie or Forky) and runs the official DietPi installer over it. You keep the YUMI hardware stack (custom U-Boot, overclocked kernel, Smart Pi One device tree) and gain the DietPi userland:
| Layer | What you get |
|---|---|
| Base system | Debian 13 (trixie) or Debian 14 (forky, preview), armhf — stripped of everything a headless board does not need |
| Memory | About 87 MB RAM at idle, logs in RAM (ramlog) instead of on the SD card — a desktop image uses several hundred MB more |
| Image size | About 293 MB compressed, expands to fill the card on first boot |
| Software | dietpi-software — a catalog of ready-to-run, pre-optimised installs |
| Configuration | dietpi-config and dietpi-launcher — menu-driven, no config files to hunt down |
On a board with 1 GB of RAM and an Allwinner H3, that headroom is the whole point: a media server, a home automation hub or a small web service has several hundred megabytes more to work with than on a full Armbian server install.
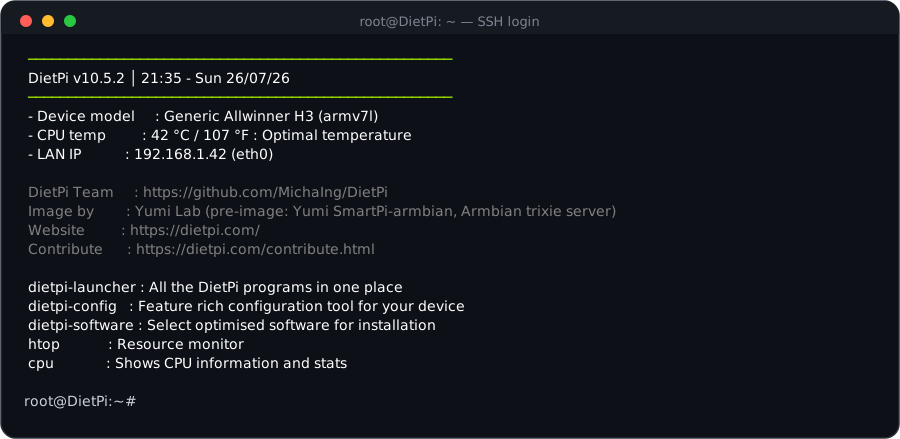 The DietPi login banner. Values shown are illustrative.
2. Download and flash
microSD card compatibility
- Minimum: 4 GB
- Maximum: 32 GB — larger cards are not supported
1. Download the .img.xz file and its .sha256 companion from the release page:
| Distribution | File | Size | Release |
|---|---|---|---|
| Debian 13 Trixie | Yumi-smartpi1-trixie-debian13-dietpi-2026-10-14-0057.img.xz |
571 MB | v1.8.0-rc6 — 2026-10-14 |
| Debian 14 Forky (preview) | Yumi-smartpi1-forky-debian14-dietpi-2026-10-14-0113.img.xz |
621 MB | v1.8.0-rc6 — 2026-10-14 |
The matching .sha256 file for each image is on the release page.
2. Verify the checksum — both files must sit in the same folder:
3. Flash the card with Raspberry Pi Imager (Choose OS → Use custom), balenaEtcher, or dd:
xzcat Yumi-smartpi1-<variant>-dietpi-<date>.img.xz | sudo dd of=/dev/sdX bs=1M status=progress conv=fsync
Both Imager and Etcher read the .img.xz directly — no need to decompress it first. With dd, double-check /dev/sdX: writing to the wrong device will destroy it.
The flash guide walks through balenaEtcher step by step if you would rather follow screenshots.
3. First boot — nothing to do
This image configures itself. No screen, no keyboard, no wizard, no questions:
- Insert the microSD card into the Smart Pi One.
- Connect Ethernet (or prepare WiFi first — see section 6).
- Power the board on and wait 2 to 3 minutes.
During that time DietPi expands the filesystem, completes its first-run setup and reboots on its own. When it settles, the board answers over SSH.
Finding the board
On Ethernet the board takes a DHCP lease and registers as DietPi. Try ssh root@DietPi.local, look it up in your router's client list, or use the USB cable method below, which always gives you the same fixed address.
4. Default accounts
Two accounts ship with the image, both with the password yumi:
| User | Password | Notes |
|---|---|---|
root |
yumi |
Full administrator |
pi |
yumi |
Everyday account, member of sudo |
The pi account is set up the way you would expect on an SBC — it belongs to sudo, dialout, i2c, spi, gpio, video, audio and plugdev, so GPIO, I2C, SPI and the serial port work without extra configuration.
Change the passwords
A board reachable on your network with a documented default password is an open door. Change both, straight after the first login:
5. Network access
Ethernet
Plugged in, the board takes an address by DHCP — nothing to configure. Then:
SSH over the USB cable (OTG port)
A single USB cable between the Smart Pi One's OTG port and your computer both powers the board and carries the network. No Ethernet, no WiFi, no adapter: one cable and you are in.
The board answers at 172.22.1.1. Give your computer an address on the same subnet — 172.22.1.2 with mask 255.255.255.0 (/24) — on the new network interface that appears when you plug the cable in, then:
The gadget uses the CDC NCM protocol, which macOS, Linux and Windows all recognise natively — no driver to install.
Unplugging the cable cuts the power
That cable is the board's power supply as well as its network link: pull it and the board loses power. And for a sustained workload with the optional overclock enabled, a computer's USB port may not deliver enough current — use a dedicated 5 V / 2 A supply and keep the USB cable for data only.
This works the same way on every current YUMI Linux image, not just DietPi.
6. WiFi
The Smart Pi One has no onboard WiFi — you need a USB WiFi adapter.
The WiFi stack (iw, wpasupplicant, wireless-regdb) is pre-installed in this image, and WiFi is enabled by default in dietpi.txt. That matters: DietPi normally fetches those packages when you enable WiFi, which is impossible on a board whose only way online is the WiFi you are trying to configure. Here it works offline, out of the box — plug in an adapter and add your credentials, no internet connection needed first.
At first boot, DietPi brings up WiFi if a working adapter is present, and falls back to Ethernet automatically otherwise — the normal case here, since the board has no onboard WiFi. Plug in Ethernet, or a WiFi adapter with your credentials already set (below), and either one gets you online with nothing to configure by hand.
After the first boot, from the board
Then Network Options: Adapters → WiFi: enable the adapter, scan, pick your network, enter the passphrase. Set your country code in the same menu (the image ships with the DietPi default, GB — set yours here).
Before the first boot, with no screen
The boot partition is FAT32 and is labelled armbi_boot, so it mounts on macOS and Windows as soon as you plug the freshly flashed card into a card reader. AUTO_SETUP_NET_WIFI_ENABLED=1 is already set in dietpi.txt — you only need to add your network in dietpi-wifi.txt:
Set your own country in dietpi.txt if you are not in the UK:
Eject the card cleanly, boot the board, and it joins your network on its own.
One thing to know
dietpi-wifi.txt disappears after the first boot. DietPi moves your credentials into /var/lib/dietpi/dietpi-wifi.db so the passphrase is not left in clear text on a partition any computer can read. To change networks later, use dietpi-config.
7. What it inherits from our base image
Everything that makes the YUMI Linux images specific to these boards survives the DietPi conversion:
| Feature | Detail |
|---|---|
| Optional CPU overclock | Stock is up to 1296 MHz; sudo smartpi-oc on switches to a fixed 1368 MHz, smartpi-oc off reverts |
| Custom U-Boot | DRAM at 576 MHz with ZQ calibration and ODT |
| Device tree | YUMi SmartPi One — check it with cat /proc/device-tree/model |
| Smart Pad screen rotation | The 4.3" 800x480 touchscreen is detected at boot and the display rotated 180° only then — on a regular HDMI monitor the orientation is untouched |
| Kernel packages held | apt-mark hold on every linux-* package |
That last one matters. The generic kernels on apt.armbian.com do not carry our DRAM timings or the Smart Pi One device tree, and a board booted with one of them does not come back. The hold makes sure no apt upgrade or dietpi-update can quietly replace the kernel.
Smart Pad
The Smart Pad is a Smart Pi One fitted with the 4.3" touchscreen, mounted upside-down. Because the rotation is decided at runtime, the same image serves both products — there is no separate Smart Pad download.
8. Building DKMS modules
To compile kernel modules on the board (a WiFi driver, a sensor driver…), install the headers from the SmartPi-armbian release that matches your image — not from apt.armbian.com, whose generic builds do not match this kernel.
The headers are held, so release the hold first:
# 1. Release the hold
sudo apt-mark unhold linux-headers-current-sunxi

# 2. Install the .deb attached to the SmartPi-armbian release
sudo dpkg -i linux-headers-current-sunxi_*_armhf__6.18*.deb
sudo apt-get -f install

# 3. Hold it again so a later upgrade cannot swap it out
sudo apt-mark hold linux-headers-current-sunxi
The matching linux-headers, linux-image, linux-dtb and linux-u-boot packages are attached to the SmartPi-armbian releases.
9. Everyday commands
| Command | What it does |
|---|---|
dietpi-launcher |
Every DietPi tool in one menu |
dietpi-config |
Network, WiFi, display, audio, performance, locale |
dietpi-software |
Install software from the optimised catalog |
dietpi-update |
Update DietPi itself |
dietpi-backup |
Back up and restore the system |
htop |
Resource monitor |
cpu |
CPU temperature, frequencies and governor |
Logged in as pi, prefix them with sudo — sudo dietpi-config, sudo dietpi-software. As root, run them directly.
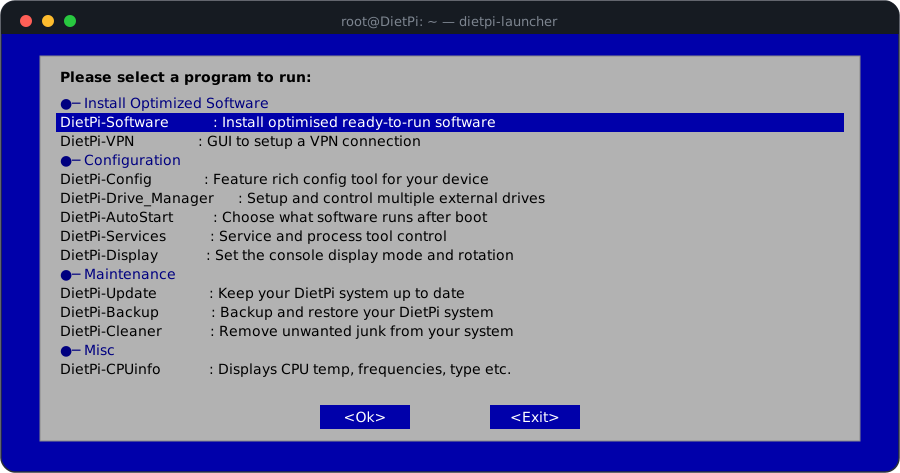
dietpi-launcher — the entry point to every DietPi tool.
10. Quick checks
Two commands confirm you are running the YUMI build and not a generic Allwinner H3 image:
cat /proc/device-tree/model
# YUMi SmartPi One

cat /sys/devices/system/cpu/cpu0/cpufreq/cpuinfo_max_freq
# 1296000  (1368000 once the optional overclock is enabled)
And to see the memory footprint for yourself:
11. Notes
- Status: release candidate. Functional and in daily use here, still being refined.
- Board support: one image for the Smart Pi One and the Smart Pad — the screen is detected at boot.
- DietPi itself: the catalog, services, backups and tooling are documented upstream at dietpi.com/docs. DietPi is a community project by MichaIng; YUMI-LAB only maintains this Smart Pi One build.
- Prefer a full Armbian system? The official Linux images offer Debian and Ubuntu, server and desktop.