2.9 How to Test the MPU-6050 and ADXL345 Sensors on Smart Pi One (Python and C)
This guide explains how to connect and test the MPU-6050 and ADXL345 sensors with the Smart Pi One board using both Python (via the smartpi-mpu6050 package) and C. It also covers how to detect the sensors via I2C.
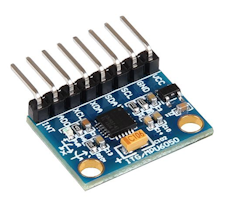
1. Prerequisites
Hardware
- Smart Pi One board
- Jumper wires for connections
- MPU-6050 sensor or ADXL345 sensor
Software
- Python 3.6 or higher
smartpi-mpu6050Python package- I2C enabled on the Smart Pi One
python3-smbussystem library for I2C communicationlibi2c-devpackage for C development
2. Activating I2C on Smart Pi One (for MPU-6050 and ADXL345)
Before starting with sensor tests, ensure that I2C is enabled on the Smart Pi One. Follow these steps:
-
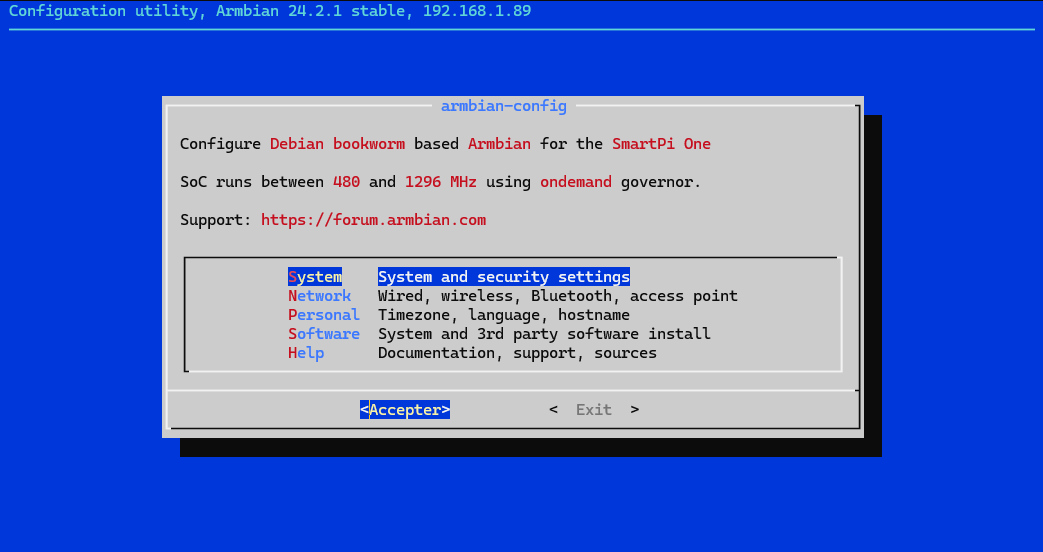
Open Armbian-Config via an SSH interface or terminal window:
-
Choose System:
-
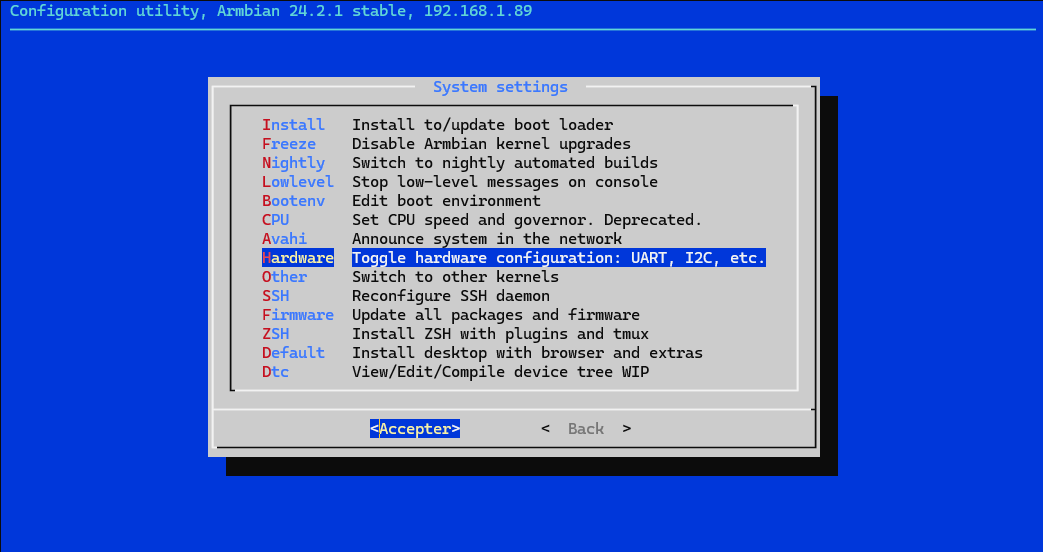
Select Hardware:
-
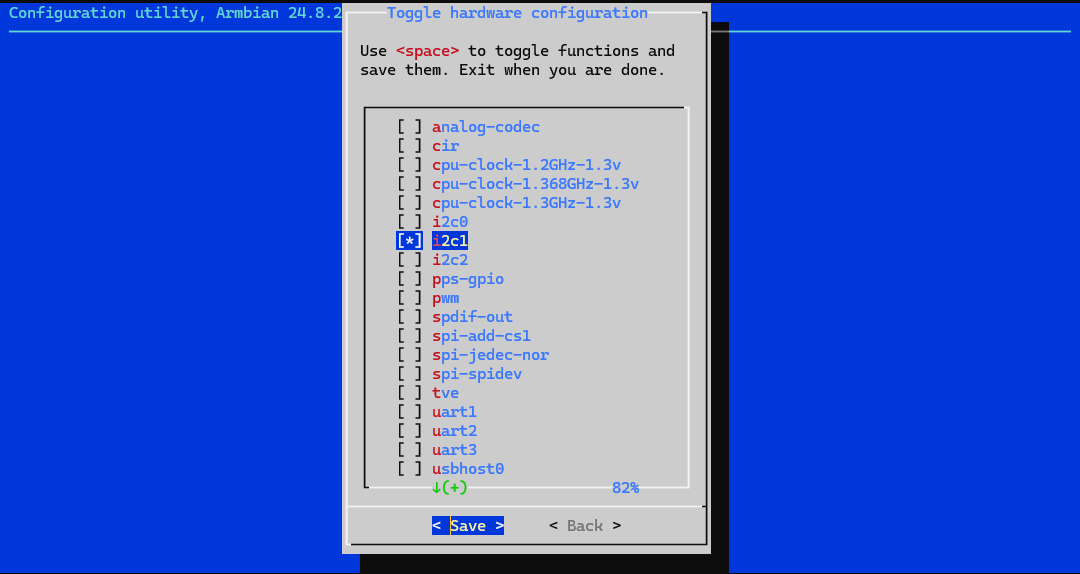
Enable i2c1, then Save and Back:
-
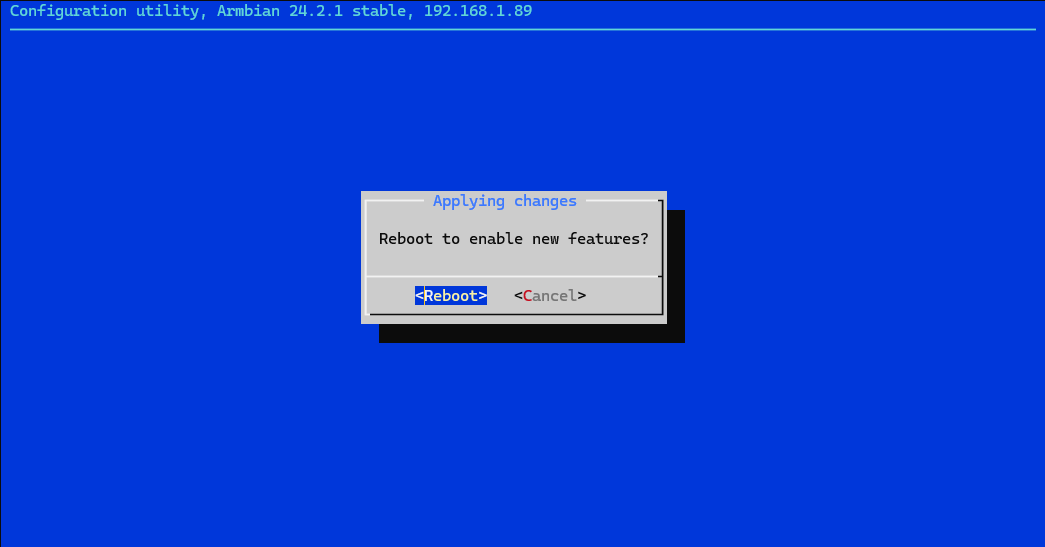
To finish, Reboot to apply the changes:
3. How to Test the MPU-6050 Sensor
Wiring Diagram
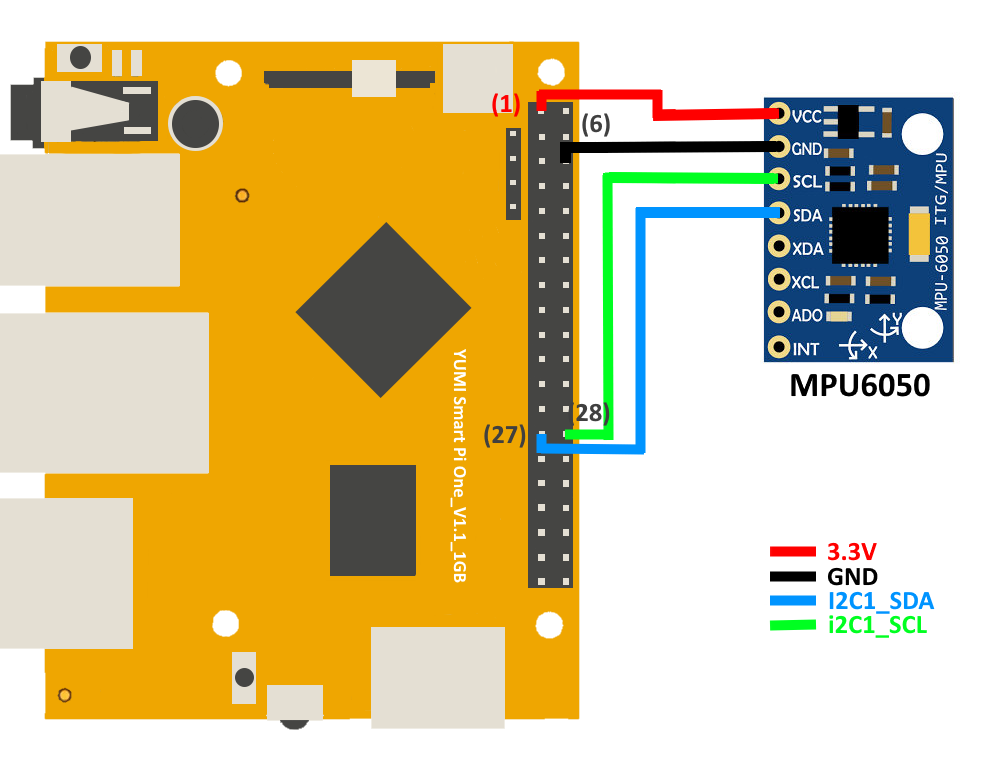
Connect the MPU-6050 sensor to the Smart Pi One using this setup:
| MPU-6050 Pin | Smart Pi One Pin | Description |
|---|---|---|
| VCC | (1) 3.3V | Power |
| GND | (6) GND | Ground |
| SCL | (27) SCL (I2C1 Clock) | I2C Clock |
| SDA | (28) SDA (I2C1 Data) | I2C Data |
Detecting the MPU-6050 Using I2C
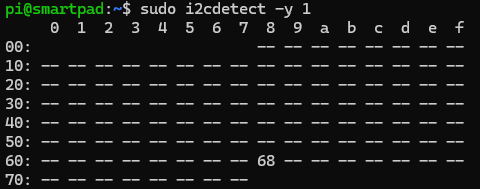
Run the following step to verify that the MPU-6050 sensor is detected:
You should see the MPU-6050 detected at address 0x68.
Using Python to Read MPU-6050 Data
Example Python Script for Testing MPU-6050:
Here’s a complete script to read MPU-6050 from the sensor:
from smartpi_mpu6050.mpu6050 import MPU6050

mpu = MPU6050(0x68)

temp = mpu.get_temp()
print(f"Temperature: {temp:.2f} °C")

accel_data = mpu.get_accel_data()
print(f"Accelerometer: X={accel_data['x']:.2f} m/s^2, Y={accel_data['y']:.2f} m/s^2, Z={accel_data['z']:.2f} m/s^2")

gyro_data = mpu.get_gyro_data()
print(f"Gyroscope: X={gyro_data['x']:.2f} °/s, Y={gyro_data['y']:.2f} °/s, Z={gyro_data['z']:.2f} °/s")
Creating and Running the Script
Prerequisites
Install the required system libraries for I2C communication:
Install the Python package:
-
Open a text editor, such as nano, and create the Python file:
-
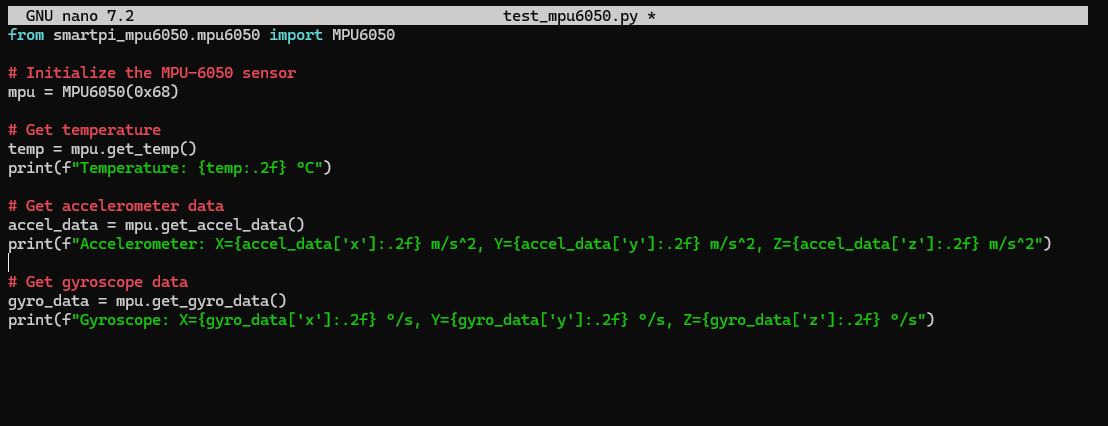
Paste the script into the file and save it.
-
Execute the script with the necessary permissions (you may need to use sudo):
You should see the temperature, accelerometer, and gyroscope data in the terminal.

Using a C Program to Read MPU-6050 Data
Example C Program
#include <stdio.h>
#include <linux/i2c-dev.h>
#include <i2c/smbus.h>
#include <sys/ioctl.h>
#include <fcntl.h>
#include <unistd.h>

#define MPU6050_ADDR 0x68
#define PWR_MGMT_1   0x6B
#define ACCEL_XOUT0  0x3B
#define TEMP_OUT0    0x41

int read_word_2c(int fd, int reg) {
    int high = i2c_smbus_read_byte_data(fd, reg);
    int low = i2c_smbus_read_byte_data(fd, reg + 1);
    int val = (high << 8) + low;
    if (val >= 0x8000) {
        val = -(65535 - val + 1);
    }
    return val;
}

int main() {
    int fd;
    char *filename = (char*)"/dev/i2c-1";

    if ((fd = open(filename, O_RDWR)) < 0) {
        printf("Failed to open the i2c bus\n");
        return 1;
    }

    if (ioctl(fd, I2C_SLAVE, MPU6050_ADDR) < 0) {
        printf("Failed to acquire bus access and/or talk to slave\n");
        return 1;
    }

    i2c_smbus_write_byte_data(fd, PWR_MGMT_1, 0x00);

    int accel_x = read_word_2c(fd, ACCEL_XOUT0);
    int accel_y = read_word_2c(fd, ACCEL_XOUT0 + 2);
    int accel_z = read_word_2c(fd, ACCEL_XOUT0 + 4);

    int temp_raw = read_word_2c(fd, TEMP_OUT0);
    float temp = (temp_raw / 340.0) + 36.53;

    printf("Temperature: %.2f C\n", temp);
    printf("Accelerometer: X=%d Y=%d Z=%d\n", accel_x, accel_y, accel_z);

    close(fd);
    return 0;
}
Compilation and Execution
Prerequisites
Install the required I2C development library:
-
Open a text editor, such as nano, to create the C file:
-
Paste the C program into the file and save it.
-
Compile the program with
-
Run the program:
You should see the temperature and accelerometer data printed to the terminal.

4. How to Test the ADXL345 Sensor
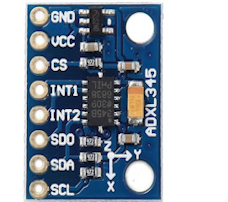
Wiring Diagram
Connect the ADXL345 sensor to the Smart Pi One using this setup:
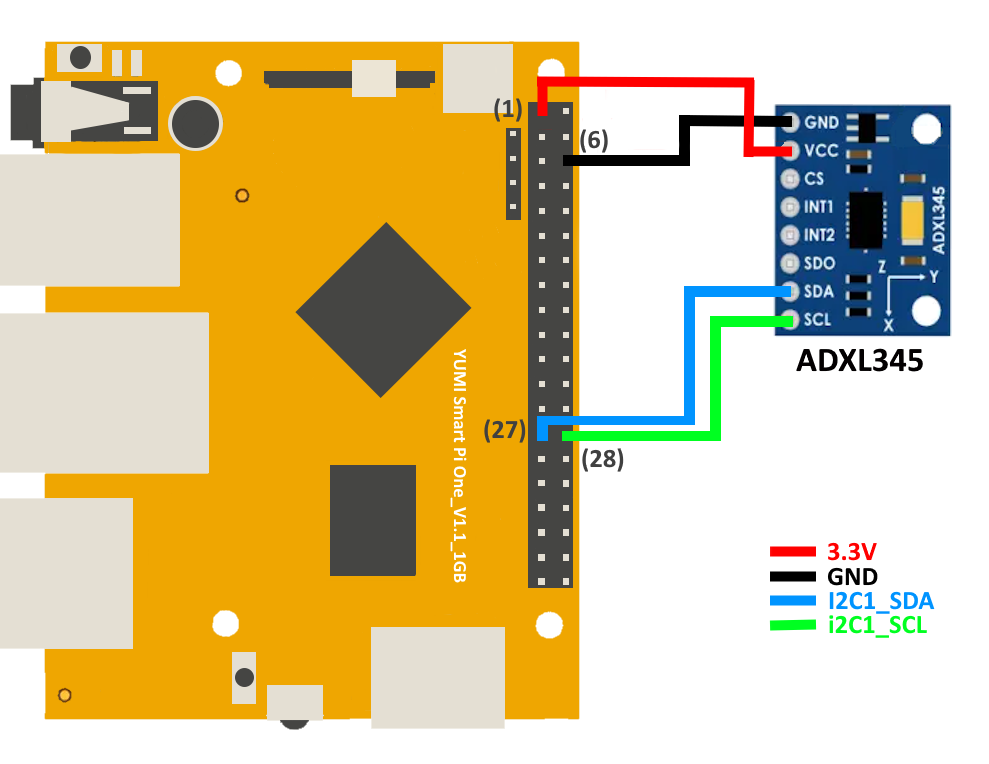
| ADXL345 Pin | Smart Pi One Pin | Description |
|---|---|---|
| VCC | (1) 3.3V | Power |
| GND | (6) | Ground |
| SCL | (27) SCL (I2C1 Clock) | I2C Clock |
| SDA | (28) SDA (I2C1 Data) | I2C Data |
Detecting the ADXL345 Using I2C
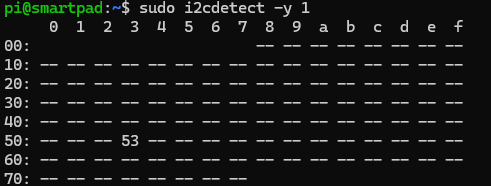
Run the following step to verify that the ADXL345 sensor is detected:
sudo i2cdetect -y 1
```
You should see the ADXL345 detected at address `0x53`.
### Using Python to Read ADXL345 Data
### Example Python Script for Testing ADXL345
Here’s a complete script to read data from the ADXL345 sensor:
```python
from smartpi_mpu6050.mpu6050 import MPU6050
adxl = MPU6050(0x53)
accel_data = adxl.get_accel_data()
print(f"Accelerometer: X={accel_data['x']:.2f} m/s^2, Y={accel_data['y']:.2f} m/s^2, Z={accel_data['z']:.2f} m/s^2")
Creating and Running the Script
Prerequisites
Install the required system libraries for I2C communication:
Install the Python package:
-
Open a text editor, such as nano, and create the Python file:
-
Paste the script into the file and save it.
-
Execute the script with the necessary permissions (you may need to use sudo):
You should see the accelerometer data in the terminal.

Using a C Program to Read ADXL345 Data
Example C Program
#include <stdio.h>
#include <linux/i2c-dev.h>
#include <i2c/smbus.h>
#include <sys/ioctl.h>
#include <fcntl.h>
#include <unistd.h>

#define ADXL345_ADDR 0x53
#define POWER_CTL     0x2D
#define DATA_FORMAT   0x31
#define DATAX0       0x32

int read_word_2c(int fd, int reg) {
    int low = i2c_smbus_read_byte_data(fd, reg);
    int high = i2c_smbus_read_byte_data(fd, reg + 1);
    int val = (high << 8) + low;
    return val;
}

int main() {
    int fd;
    char *filename = (char*)"/dev/i2c-1";

    if ((fd = open(filename, O_RDWR)) < 0) {
        printf("Failed to open the i2c bus\n");
        return 1;
    }

    if (ioctl(fd, I2C_SLAVE, ADXL345_ADDR) < 0) {
        printf("Failed to acquire bus access and/or talk to slave\n");
        return 1;
    }

    i2c_smbus_write_byte_data(fd, POWER_CTL, 0x08);  // Set the device to measure mode
    i2c_smbus_write_byte_data(fd, DATA_FORMAT, 0x00); // Set the range to +/- 2g

    int accel_x = read_word_2c(fd, DATAX0);
    int accel_y = read_word_2c(fd, DATAX0 + 2);
    int accel_z = read_word_2c(fd, DATAX0 + 4);

    printf("Accelerometer: X=%d Y=%d Z=%d\n", accel_x, accel_y, accel_z);

    close(fd);
    return 0;
}
Compilation and Execution
Prerequisites
Install the required I2C development library:
Example C Program Steps
-
Open a text editor, such as nano, to create the C file:
-
Paste the C program into the file and save it.
-
Compile the program with:
-
Run the program:
You should see the accelerometer data printed in the terminal.

5. Troubleshooting
Common Issues:
- I2C Device Not Detected
- Ensure I2C is enabled on the Smart Pi One using
sudo armbian-config. - Verify the connections of the SDA and SCL pins.
- Use the following command to check if the MPU-6050 or ADXL345
is detected:
- You should see the address0x68 (or 0x53 for ADXL345) in the output.
- No Data from Sensor
- Ensure the correct I2C address (
0x68(or0x53for ADXL345)) is being used in the code. -
Check power and ground connections.
-
Library Installation Issues
- Ensure that
python3-smbusorlibi2c-devis installed, depending on the language you're using.